In this article, you will find the process to update MXQ Pro 4K firmware. Let’s jump into our main topic and don’t escape any step. if you want to update MXQ Pro 4K firmware successfully.
MXQ Pro 4K is a streaming device running on the Amlogic S905 operating Android 5.1 Lollipop. It is among the few devices that are less expensive that Amazon Firestick and other well-known Android boxes like the MiBox.
The capability of streaming Kodi through MXQ Pro is the highlighting feature of the streaming device since older versions were equipped with the Amlogic S805SOC that operates on an operating system that isn’t Lollipop. Kodi does not support Android operating systems before lollipop.
While the streaming device does have manual controls, it’s not possible to change it to the latest version of MXQ Pro firmware to the latest version without. You’ll need to go through a sequence of steps before being able to upgrade your MXQ Pro firmware.
The S905 is fast and can easily run android 6.0 Marshmallow. It can also operate Nougat or Oreo You can now do it. So, in this tutorial, let’s look at how to upgrade your MXQ Professional 4K to Marshmallow firmware.

How do I update MXQ Pro 4k Firmware?
We’re here to assist you through the steps of how to upgrade the MXQ Pro firmware. You’ll require the following items to upgrade the MXQ Pro 4K firmware. The items you’ll need include:
Alert: Firestick and Kodi User
ISPs and the Government are constantly monitoring your online activities, If you are streaming copyrighted content through Firestick, Kodi or any other unauthorised streaming service ,It could lead you into trouble. Your IP Address:34.217.39.76 is publicly visible to everyone.
TheFirestickTV suggests to use VPN Service For Safe Streaming. We recommend you to use ExpressVPN, It's one of the safest and fast VPN available in the Market. You wil get 3 Months For Free if you buy 12 month plan.3 Month Free on 1 year Plan at Just $6.67/Month
30-Days Money Back Guarantee
- Windows Desktop
- Pin
- USB connects to a USB cable
The download process involves downloading this USB Burning Tool and the most recent Firmware
Step 1: Download the Amlogic USB Burning Tool zip file to the Windows Desktop.
Step 2: Then extract the zip file to the Windows Desktop.
Step 3: Install the latest firmware through a given link on your PC: https://bit.ly/2UzImFF.

Connect the MXQ Pro 4K box Windows Desktop
Step 4: Then get associated with your Windows Desktop (PC) as well as your MXQ Pro 4K box via a USB cable.
Step 5: Press and hold the Reset button on MXQ Pro 4K box until the conclusion of the process. You’ll require an access code for this step.
Update the Firmware
Step 6: Launch Amlogic’s USB Burning tool to open it on the Windows Desktop and then select its .exe tool.
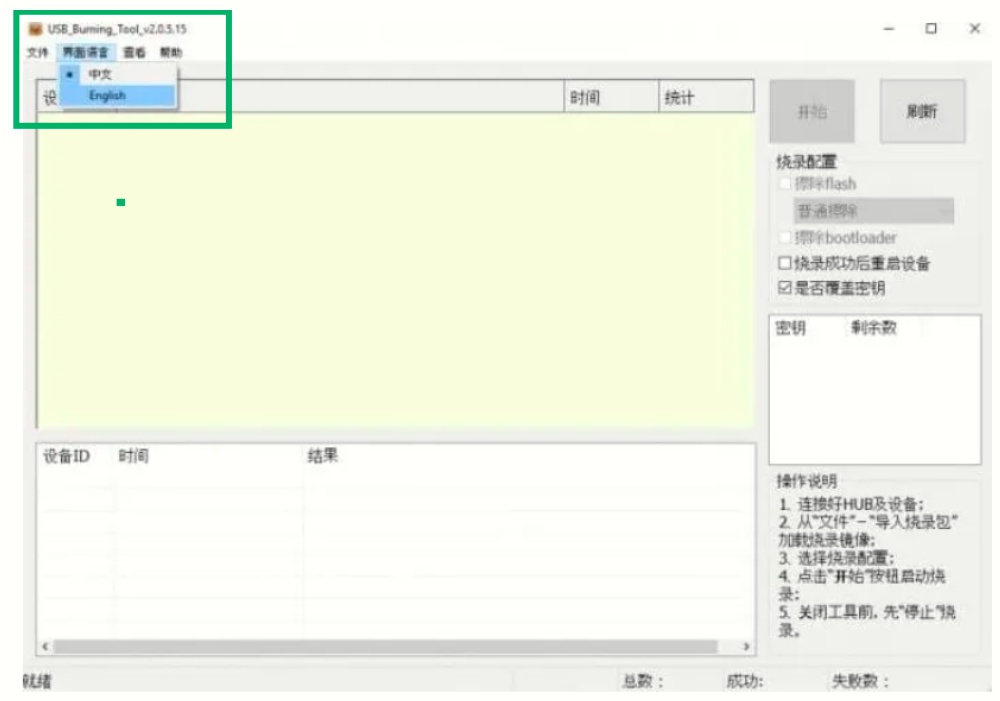
Step 7: You will be presented with a different language. To switch to English select the alternative from the Windows Desktop screen and click English.

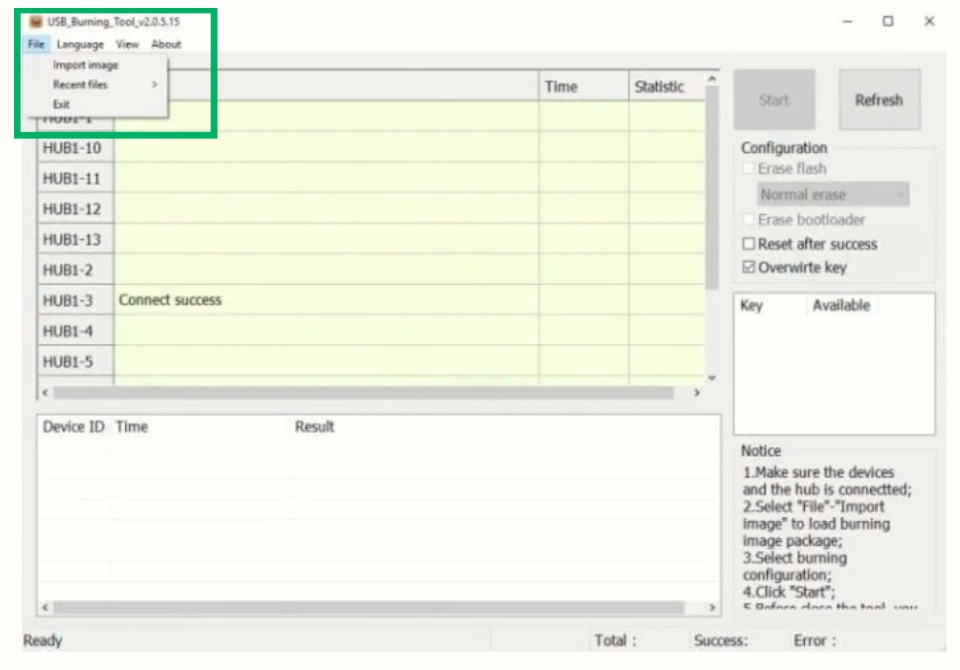
Step 8: You will get connect successfully message on display if you installed it successfully.

Step 9: Choose the Import Image from the File menu on your Windows Desktop.

Step 10: Choose the .img file on Windows Desktop.
Step 11: Remove the right tick on the checkbox of Overwrite Key on your Windows Desktop.

Step 12: Click on the Start button that is discovered below the Title section on your WindowsDesktop to update the device.

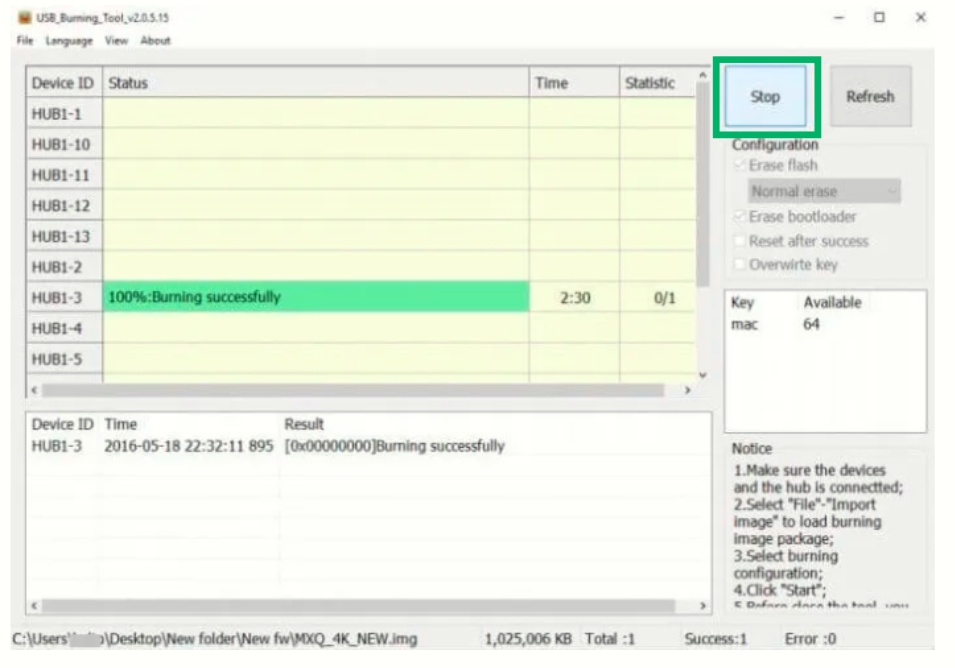
Step 13: You will notice the status of the download under the Status. When the download is complete, click the Stop button that is located on the right which is the start button on the Windows desktop.

Step 14: Release the Reset button on your MXQ Pro 4K Box, which you’ve held at the start of the process.
So this was simple to update MXQ Pro 4K Box. I hope you successfully update.
MXQ Pro 4K Upgrade Secrets:
TheFirestickTV.com Does Not Promote Or Encourage Any Illegal Use Of Kodi, FireStick Or any streaming services. Users Are Responsible For Their Actions.


